Monday, 30 November 2015

Texturing the Tie Interceptor & Slave I

For the tie interceptor and Slave I. I
used the same method as the X-Wing and used architectural metal materials and and and coloured specific polygons. I also did the same thing as the X-wing with the engines and the glowing architectural material.


I am happy with the result although like before much more detail is needed especially with the Slave I. This would be achievable by using UVW maps.

Sunday, 29 November 2015

Texturing the X-Wing, Part 3


 After finishing the X-Wing I thought using non basic materials would be much better.


I decided to change all the standard materials to metal materials.


Friday, 27 November 2015

Texturing the X-Wing, Part 2

I used architectural material and increased the luminance to 30000, for the glowing engine lights this is effective an much like the actual X-Wing.


Wednesday, 25 November 2015

Texturing the X-Wing, Part 1

 At first I tried using UVW mapping to attempt texturing, this proved to be extremely difficult and because of the i resorted to texturing different polygons with basic colours to achieve almost the same effect. I am happy with the outcome but feel it could definitely be more detailed and this could be achieved with the UVW mapping.


I used the material slate editor to create my colour materials, 


Monday, 23 November 2015

Tool Test: Materials

Long overdue, After watching the tutorials on Lynda.com, I thought I would test the Slate Material Editor.


The slate material editor seems relatively easy to use and there a number of different material options and parameters to use to achieve different kinds of finished such as matte or metal, ect.

Friday, 13 November 2015

The 3 Finished Models

I am overall rather pleased with the final outcome of each model, I would have like to put some more time into my third model the Slave I  but I didn't have time before the deadline.

 Tie Interceptor

X-Wing

Slave I

Thursday, 12 November 2015

Creating the Slave I, Part 2

This i how i finished the Slave I model, It was mostly modeled by manipulating vertices and edges. the only tools used were a boolean to cut the portion out of the main wing flap and a mirror modifier to duplicate the wing to the other side of the model.


I am pleased with how this model turned out, i am sure there a tools available that may have made this project a lot easier and this has highlighted to me i need to research more of the available tools in 3ds Max. As this model was mostly created from manual manipulation it seems to be fairly polygon efficient with 4560 polygons.

Wednesday, 11 November 2015

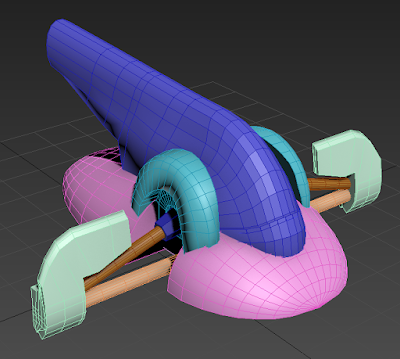
Creating the Slave I, Part 1

Much like the X-Wing model I have not taken many screen shots of the development of this model.
I started with the main body i made this from a cylinder and manipulating the vertices and the edges. As can be seen below to make the top part i just kept extruding the polygon and rotating it into place. I am unsure as to whether this is the best method for polygon efficiency but as far as i am aware this is using very few polygons and will work towards the efficiency of the model.


Below is the start of the modeling of the wheel arch like objects over the wings on the model, unfortunately this is the only screenshot i have of this process along with a picture of the final result.


This was also made with vertex and edge manipulation.

I am pleased with the end result of this, I feel like there may have been an easier way of achieving this but this method has worked just fine.

The 3rd Model

After planning my animation earlier on it occurred to me that i had not really chosen a 3rd model, up until now i have been thinking about what that model might be. Going back to my mood board I have decided to do the Slave I, Jango and Boba Fett's ship as it is one ship from the franchise.

Tuesday, 10 November 2015

Creating the X-Wing

Unfortunately i have very few screenshots of my progress for this model as I must have gotten so swept up in the making process. This was not posted until the model was complete.


For the most part this model was not particularly difficult,the main body was modeled from a box using simple vertex manipulation. The wings are made from boxes and the guns on the wings are made using a cylinder and the inset tool and the extrude tool to make different sized portions of the cylinder. 


I am happy with the outcome of this model the only thing i would have liked to improve is the cockpit window set up, which is currently achieved using the inset and extrude tools, I feel it may have been better to have used the spline tools much like in my Tie Interceptor model.

Friday, 6 November 2015

Tool Test: Melt

I thought i would test this tool as i see it on the list and was intrigued as to how it would work.


I don't know how helpful this tool will be but its definitely an interesting tool.

Creating the Tie Interceptor, Part 5

This is the final update to the modelling of the Tie Interceptor.

Here I have added a very basic gun to the wing, I plan to  make this look much better when i comes to texturing the model, at the moment it looks rater poor but I felt it was important to not add too much minor detail as this effects the polygon count and efficiency of the model, and can be achieved with textures.

I have also added the indented panels on the wing face using the inset tool, I am happy how this came out, some use of the connect tool and manipulation of edges was required for the middle panel, but overall I feel this went well.


The final thing to do was to duplicate the wing and mirror it to the other side, This tool is extremely helpful as it saves having to create another wing, i am very happy with the results.

Wednesday, 4 November 2015

Creating the Tie Interceptor, Part 4

For the next task I decided to reverse extrude the polygons behind the windscreen to make it look more like a cockpit.


After this I modeled the back of the, Fot the hexagon shape in the middle i used the boolean tool making the shape outline i needed and subtracting it from the sphere object. I am pleased with the outcome of this as it looks much like the actual ship.


Tuesday, 3 November 2015

Colleague Blog Review 2

I felt it may be useful to further look at another colleagues blog to investigate any improvements i could currently be implementing into my own.
This blog looks much like my own, although a couple of things I have noticed that i like that I have not done on my own blog. I like the inclusion of YouTube videos to show animation attempts, i have yet to attempt any animation, but when i do i will definitely be using this. I also like that the screenshots of the modelling process have been cropped this make it much easier to see the focus of the screen shot, although for some screen shots i do prefer showing all 4 view ports.

Sunday, 1 November 2015

Creating the Tie Interceptor, Part 3

This one is a fairly small update, I have added the trim for the wing of the interceptor.


Using the same method as the wings i created boxes and manipulated and rotated them to fit the angles for the wing and then deleted the polygons between the boxes and collapsed the vertexes to make it one shape. I positioned the boxes to go through the wing to account for the trim on the other side, this should help to keep the polygon and object count low. I also created the hexagon shape for the middle of the wing using the shapes tool for a hexagon and using the extrude modifier and changing it to an editable mesh to manipulate it.